
Drømmekage (Danish Dream Cake)
On Tuesday my friend Åsne’s dog Kaos turned nine years old, which was a great excuse to bake a cake (for the humans celebrating). Yes, I’m finding lots of excuses to bake cakes these days.
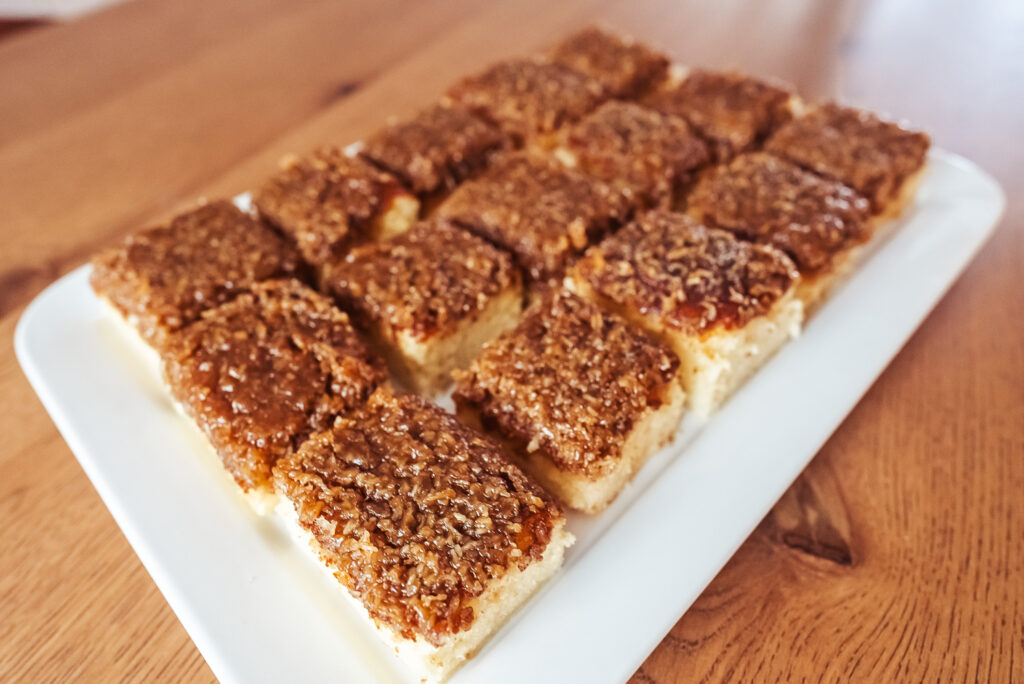
Summer always puts me in the mood for coconut, so I decided to make a drømmekage, or Danish dream cake, which is a light and buttery vanilla sponge cake with an incredibly flavorful caramelized coconut topping. Seriously, the coconut topping is so delicious I would totally eat it on its own like candy.
Actually I would also eat this sponge cake on its own without the coconut topping, because it’s also so delicious. I think drømmekage is one of my all time favorite cake bases.

Drømmekage is sort of similar to Swedish silviakaka, as both are vanilla sponge cakes with a coconut topping. But the dream cake sponge is a bit richer than the Silvia cake sponge, which makes sense considering the Silvia cake batter is thinned out with water, while the dream cake batter is thinned out with melted butter and milk.
The dream cake also has a lot more coconut in the topping, so if you’re a fan of coconut you will love drømmekage. And you might even love it if you’re not a big fan of coconut – this cake is simply so good.
Drommekage history
Drømmekage has a really sweet history. Danish dream cake comes from the village of Brovst in Jutland. It gained popularity after a child entered her grandmother’s secret cake recipe in a competition and won.
I wonder how her grandmother felt about her secret recipe spreading all over Denmark and Scandinavia, but hopefully she was proud of her delicious creation, because drømmekage really does taste like a dream. It’s no wonder it’s become so hugely popular here.
Tips
It’s a lot easier to use a hand mixer to whisk the eggs and sugar together so that you can get them as stiff as possible. They should be very pale when you’re finished whisking. However you can also do this with a simple whisk if you don’t have a mixer.

Then you’ll melt the butter in a saucepan and add the milk. Set the milk mixture aside to cool a bit.
While the milk mixture is cooling, combine all the dry ingredients in a small bowl. Then sift them into the egg and sugar mixture.

I know we all often skip the sift when recipes call for sifting in flour, but in this case you really should run all the dry ingredients together through a sift or strainer when adding them to the batter. This will help you to stir the batter as little as possible, maintaining all the air you whisked in with the eggs, while still getting a totally smooth batter free from any lumps of flour.
You don’t want to over stir the batter, because then you can get left with a dense cake, instead of the beautiful light sponge cake you will get with minimal stirring.
Then pour the cake batter into your baking pan lined with baking paper and bake for 18 – 20 minutes, until the top is golden brown but not burnt.

You don’t need to wash the saucepan after heating up the butter and milk for the cake batter, as you can use the same saucepan again for the coconut topping (which also contains butter and milk).
You can make the coconut topping while the cake is baking, but move quickly, as you want to make sure it’s done when it’s time to remove the cake from the oven.
Melt the butter in a saucepan and then remove it from the heat. Stir in the brown sugar, granulated sugar, and vanilla. Stir well and then stir in the milk and coconut.

Remove the cake from the oven and pour the coconut topping over the cake. Use a spatula to even out the topping over the cake, trying to make it as even as possible. Return the cake to the oven and bake for 6 – 8 minutes, until the coconut topping is fully bubbling.

Keep a close eye on the cake in the oven as it’s baking at quite a high temperature and can burn quickly. You can test the center of the cake with a toothpick; the toothpick will come out dry when the cake is done.
And then the coconut topping should all be bubbling across the entire cake (not just in the center) when you take the cake out of the oven. So again, be careful removing the cake, as the bubbling topping is hot.
Wait for the cake to fully cool before lifting it out of the cake pan and cutting into squares.

You can switch the recipe from US measurements to metric by clicking from “US Customary” to “Metric” under Ingredients.

Drømmekage (Danish Dream Cake)
Equipment
- hand (or stand) mixer
- rectangular cake pan (30×40 cm, 12×16 in)
Ingredients
- 4 eggs
- 1 and 1/2 cups granulated sugar
- 3 and 1/2 tbsp butter
- 3/4 cup milk
- 2 cups all purpose flour
- 3 tsp baking powder
- 1 tsp vanilla sugar (or extract)
Coconut topping
- 1 cup + 2 tbsp butter
- 1 and 3/4 cups brown sugar
- 1/2 cup granulated sugar
- 3 tsp vanilla sugar (or extract)
- 1/2 cup milk
- 2 and 1/2 cups shredded coconut
Instructions
- Preheat oven to 390°F (200°C). Line cake pan with baking paper.
- Whisk eggs and sugar together with a mixer until they're pale and fluffy.
- Melt the butter in a saucepan and add the milk.
- Mix the dry ingredients together and sift into the egg mixture. Carefully fold the batter, mixing as little as possible while still getting a smooth batter. Add the melted butter and milk, continuing to fold until smooth.
- Pour the batter into the cake pan and bake for 18 – 20 minutes, until the top is golden brown but not burnt.
Coconut topping
- While the cake is baking, melt the butter in a saucepan. Remove from heat and stir in the brown sugar, granulated sugar, and vanilla. Stir well and then stir in the milk and coconut.
- Remove the cake from the oven and pour the coconut topping over the cake. Use a spatula to even out the topping over the cake. Return the cake to the oven and bake for 6 – 8 minutes, until the coconut topping is fully bubbling.
- Let the cake cool in the pan before removing and cutting into squares.
33 Comments
Aly
July 29, 2023 at 2:11 pm
Wow this cake was INCREDIBLE! I used vanilla extract instead of vanilla sugar and it was perfect. Saving this recipe to make again.
Maya
August 2, 2023 at 12:20 pm
I couldn’t find my usual dream cake recipe but I think this one was even better! The cake is so light and fluffy.
Coleen
December 29, 2023 at 12:24 pm
I modified this cake recipe for gluten and dairy free, using vegetable margarine, 1:1 Redmill all purpose flour, and almond milk. This cake with the modifications was a big hit at the holidays…Everyone loved this. Would definitely make it again, and use the original recipe also. I have shared this recipe with many others.
Silvia
December 29, 2023 at 3:27 pm
Wonderful! Happy to hear the gluten and dairy free version worked out so well.
Suzanne
January 18, 2024 at 10:43 pm
This looks so good! What a great combination of flavors!
Vanessa
January 18, 2024 at 10:43 pm
Thanks for sharing! Does it keep long?
Silvia
January 19, 2024 at 9:02 am
It certainly keeps for several days, maybe up to a week in an airtight container in the fridge.
Patricia Noble
September 14, 2024 at 3:27 am
Just made it and it is amazing.
Cooked in a 9in square pan and it was perfect.
Think this is a all time favourite
Silvia
September 15, 2024 at 7:21 am
I’m so glad you loved it too!
Kate
October 27, 2024 at 3:45 am
Very easy to make and delicious!
Sidra
November 4, 2024 at 1:16 pm
Hello, can I use this recipe for a 9 inch round tin? That’s all I have. Should I just half the recipe?
Silvia
November 5, 2024 at 10:13 am
I think that should be ok! Just watch the baking time carefully to make sure the cake doesn’t burn.
Robin
November 6, 2024 at 12:27 am
Do you use sweetened or unsweetened coconut?
Silvia
November 6, 2024 at 11:38 am
I use unsweetened coconut!
Dakine
December 27, 2024 at 3:11 am
Can I use a 9×13 pan? Any ingredient adjustments needed? And cook time?
Silvia
January 2, 2025 at 9:11 am
Do you mean inches or cm? If you’re using a pan half the size, I would recommend halving the ingredients.
Heidi Brase
January 15, 2025 at 12:57 pm
You would need two 9X13 inch pans to equal the volume of a 12X16 inch pan.
Mary
January 13, 2025 at 5:58 pm
Hej. On the first baking time, should the cake be done before i put the toppings? Thanks
Silvia
January 13, 2025 at 7:50 pm
Yes, the cake will be pretty much done after the first baking.
Rk
January 26, 2025 at 6:57 am
Made this and it was so yum! I just reduced the sugar since i dont like too much sweetness. Still it came out good 🙂
RM
January 28, 2025 at 6:05 pm
Sounds really good. Comments about pan size are confusing. One person says they used a 9 inch square and another says round, and another says this would fill two 9×13 pans. Asking with gratitude, could you add a bit more about pan sizes?
Silvia
January 29, 2025 at 12:42 pm
Use a 12×16 inch pan, or equivalent volume round pan if you prefer. This would fill two 9 inch pans.
Lee
February 5, 2025 at 7:47 am
The sponge cake is delicious and the preparation instructions really helped with making a light and fluffy cake. I made the cake in a 9×13″ glass dish, however the amount of topping completely overwhelmed the cake. Next time I would cut the topping recipe in half to have a better cake/topping ratio. The cake recipe fit perfectly in the 9×13″ pan and the thickness of the cake was perfect.
Silvia
February 6, 2025 at 12:10 pm
Yes, if you half the pan size you really should half the topping amount as well. The recommended pan size is at the top of the recipe.
Jessica
March 7, 2025 at 2:57 pm
Has anyone tried to make this into cupcakes?
mayces
June 5, 2025 at 4:29 pm
The recipe says 250 g in the metric and 2 cups in the US measurements and from what I’ve converted online 250 gr is equal to just over 1 cup. Which amount is correct? Thanks!
Silvia
June 9, 2025 at 7:09 am
The numbers in the recipe are correct – 250 g flour is 2 cups.
Marquise
November 10, 2025 at 2:33 am
I just made this cake tonight and it got rave reviews! The sponge cake is perfect, I will definitely use it for future recipes!
Deam Cake
November 27, 2025 at 6:42 pm
Hi Silvia!
What a perfect excuse for a celebration and some baking!
This Drømmekage sounds absolutely divine. I’m a huge coconut fan, so your description of the caramelized topping being good enough to eat like candy has me completely sold! I also appreciate the reminder about the historical background from Brovst, and your detailed tip on sifting the dry ingredients to keep the sponge light. I often skip that step, but I will definitely follow your advice for this recipe.
Thanks for sharing this beautiful classic! I can’t wait to try it
zidane
February 15, 2026 at 7:29 am
This Dream Cake looks absolutely heavenly! It looks so soft, moist, and full of flavor — truly irresistible!
poudel
March 22, 2026 at 10:53 am
Great recipe! Drømmekage looks absolutely delicious—the soft vanilla sponge with that caramelized coconut topping sounds like the perfect combination. I love how simple it is while still feeling special. Definitely adding this Danish dream cake to my baking list!
Langtang Gosaikunda
May 15, 2026 at 10:19 am
This Drømmekage looks absolutely irresistible! The light vanilla sponge combined with that caramelized coconut topping sounds like the perfect balance of soft and rich. I love how simple ingredients turn into something so special — definitely a recipe worth trying soon!
Edward Smith
June 5, 2026 at 7:10 am
This sounds absolutely delicious your description of drømmekage really brings it to life! I love how you’ve captured both the light, buttery sponge and that rich caramelized coconut topping; it genuinely sounds like the perfect balance of flavors.
I can totally relate to finding “excuses” to bake especially when a recipe turns out this comforting and irresistible. The idea of eating the coconut topping on its own like candy is so relatable too!
Thanks for sharing this definitely adding Danish dream cake to my must-bake list!